Baby Shoe Trace
Tackle Required:
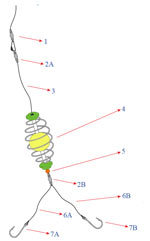
| 1 x Snap Swivel (no 1) | Sizes 10 to 16 can be used. |
| 2 x Barrel Swivels (no 2A and 2B) | Sizes 8 to 16 can be used. |
| 1 x Trace Line (no 3) | The Trace Line is normally a heavier and stronger breaking strain line than your main line, between 12 and 20lb. |
| 1 x Mielie Boll Holder (no 4) | The type of holder you use is a personal choise, just as long as it securely holds the Mielie Boll during the cast. The spring type holders normally work the best. Just keep the size of the Mielie Boll in mind when choosing the weight so as not to overload the rod. |
| 1 x Bead (no 5) | Red and fluoro yellow/green are the most popular colours to use. |
| 2 x Hooklines (no 6A and 6B) | Weaker than your Trace Line and normaly between 5 and 10lb. |
| 2 x Hooks (no 7A and 7B) | Hook sizes differ acording to the types of baits that you use. Normally a size #2 to #5 can be used with a size #5 being the most prefered hook size. |
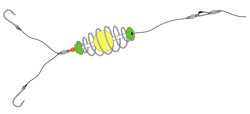
As seen on the foto the Baby Shoe Trace isn't really a difficult trace to make but we will still go through it step-by-step.
The Carp Fishing Secrets Ebook is probably the most comprehensive guide to carp fishing on the web today! A compilation of some of the best articles we've ever seen from three of the UK's favourite writers.
Buy your copy today!!!!
Alternatively you can download a free sample copy first.
Simply right click the lick and select Save Link As…
Start by tying the Trace Line (3) to the top Barrel Swivel (2A). The Trace Line is normally about 20cm long.
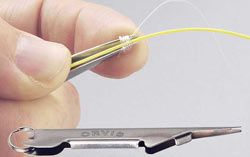
The Tie-Fast Knot tyer is a handy little tool with which you can easily make all your knots in less time and far stronger than a normal knot.
It is important to always wet your knots (simply use a little spit) before pulling them tight. If you don't do this then there is a chance that the line could burn (when tightening the line it causes friction that in turn creates heat, the same as when rubbing your hands together in the winter just a lot hotter) thus damaging your line in the proses.
You can further add a small drop of Rig Glue to help strengthen the knot; preventing it from coming loose. For more information on Rig Glue click here or if you want to purchase your own Rig Glue click here.
Next thread the Trace Line through the Millie Boll Holder and the bead (the bead is used to help protect the knot made to the bottom Swivel) and tie the line to the bottom Barrel Swivel (2B). Next tie the two hooks (7A and 7B) to the two Hook Lines (6A and 6B), the Hook Lines are about 7cm each, and then tie both the Hook Lines to the bottom Swivel (2B). When working with hooks always use care as they can and will hurt you, the best is to work a little slower at this part.
Finally tie the Snap Swivel (1) to your main line. A Snap Swivel is used to be able to quickly change or replace your traces, necessary to help save time when the catching rate is high and there is no time to make knots and fixing new traces before casing out.

